Your first game with Iris Engine
The purpose of this tutorial is to demonstrate how you can make a simple visual novel using Iris Engine from start to finish.
Warning
Iris Engine is still in development and some important features have not been implemented yet. Using it for production is not recommended.
Preparations
The first thing you’ll need to do is download the latest version of Iris Engine.
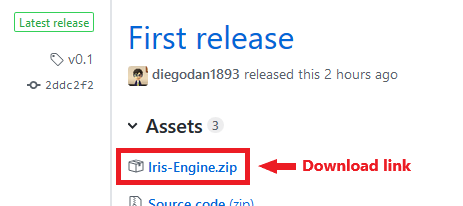
Then, create a folder for your game and unzip the contents of Iris-Engine.zip to
that folder.
You should see a file called Iris Engine.exe, it will be the executable of your
game. You can rename it if you want.
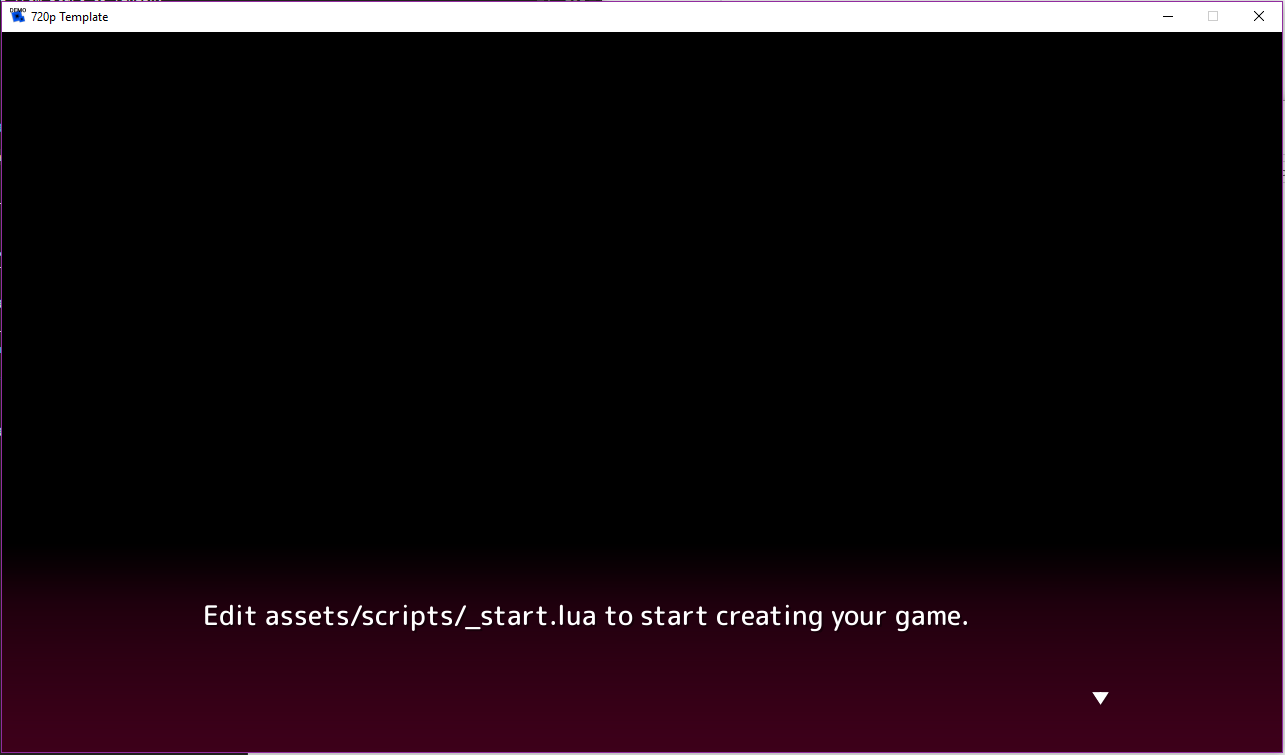
If you try to run the game right now you’ll get an error. That’s because you need a template for your game. In this tutorial we are going to make a 720p visual novel, so go ahead and download the 720p Visual Novel Template.
Unzip the contents of 720p-VN-Template.zip to the folder of your game, so that
config.lua is in the same folder as the executable of your game.
If you try to run the game now, you should see something like this:
Now open config.lua in any text editor. I personally recommend using
Sublime Text, Visual Studio Code, or Notepad++. You should find the
following line near the beginning of the file:
name = "720p Template",
Replace the text in quotes with the name of your game as you want it to appear in the title of the window. For example, if the name of your game is “Tutorial Game”, you should edit the line to look like this:
name = "Tutorial Game",
Dialogue and narration
Let’s start with the actual game. Open assets/scripts/_start.lua in your text
editor. This file contains the first script your game will run. There is already some
code there from the template but we don’t want it in our game, so delete it.
First, we are going to start by writing a bit of narration:
say "I'm on my way home from class."
say "There are more students than usual today."
say "I guess that makes sense, midterms are coming closer and all club activities have been suspended."
To try this out, copy the code above into the script you just opened, save the changes to the file and double click on the executable of your game to launch it.
As you can see, narration is written using the say word followed by the text of
the narration in quotes.
Let’s try now to make a conversation between two characters. The first thing you’ll need to do is define them. Add the following code to the beginning of the script:
h = Character.new("Haru")
s = Character.new("Sakura")
These two lines define characters. The text in quotes is the name the player will
see, while the text before the = symbol is the internal name of the character in
the code of the script, in this case h for Haru and s for Sakura.
Now that the characters are defined, we can use h and s in the same way as
say to write dialogue, like so:
h = Character.new("Haru")
s = Character.new("Sakura")

say "I'm on my way home from class."
say "There are more students than usual today."
say "I guess that makes sense, midterms are coming closer and all club activities have been suspended."

s "Hi there, Haru! Are you going home now?"
h "Yes I am. I want to study for the midterms."
s "Well, about that... I wanted to ask you something."
h "What is it?"
s "Please, help me with maths!"
The main difference between using say and the characters we defined is that
the latter shows the name of the character that is speaking.

Images
Now that we know how to write the text of our game let’s add some images, this is a visual novel after all. I’ve prepared some images so that you can follow along, click here to download them. Just unzip the contents to your game folder.
Let’s try adding a background to the game. Take a look at the content of
assets/images/backgrounds. Here are the images you can use as backgrounds for
your game. We are going to use street day.png. Add the following line just after
the definition of the characters:
scene("street day.png")
The scene function clears the screen and displays a background image, in this
case street day.png. This is especially useful in cases where every character
leaves the scene or when the action of the story moves to another place, as it will
automatically hide all other images in the screen.
Now that we have a background, let’s add a sprite for Sakura.
Tip
In video games, 2D images of characters, items and other things are called sprites.
First, take a look at the content of assets/images/characters. In Iris Engine,
character sprites are composed of a base, which is an image of the character without
a face, and a set of images with the facial expressions the character can make.
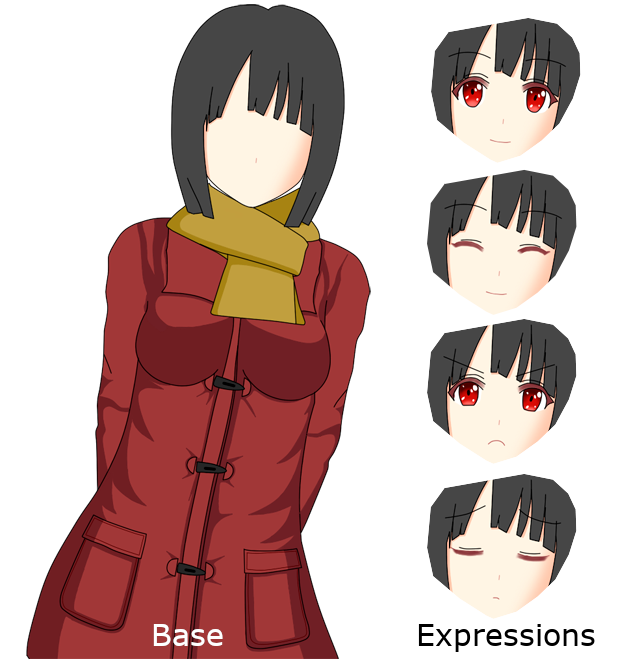
The reason for this is that it allows us to reuse the same expressions with different base images, but that’s out of the scope of this tutorial. For now, pay atenttion to the name of the files.
In order to show a character sprite, we need to define it first in a similar way as we did with characters in the previous section. Add the following code just after the definition of the characters:
sakura = CharacterSprite.new("sakura1.png")
Here, we define a character sprite that uses sakura1.png as the base image and
give it an internal name, in this case sakura, so that we can refer to it later
in the script.
Note
Before we continue, let’s talk a bit about terminology. Here, sakura is
what we call a variable. h and s are also variables.
Variables are a powerful tool that allows us to give names to things so that we can use them later in the script.
Now that the sprite is defined, we can use sakura:show("expression") to display
it with that facial expression:
h = Character.new("Haru")
s = Character.new("Sakura")

sakura = CharacterSprite.new("sakura1.png")

scene("street day.png")

say "I'm on my way home from class."
say "There are more students than usual today."
say "I guess that makes sense, midterms are coming closer and all club activities have been suspended."

sakura:show("smiling")

s "Hi there, Haru! Are you going home now?"
h "Yes I am. I want to study for the midterms."

sakura:show("serious")

s "Well, about that... I wanted to ask you something."
h "What is it?"

sakura:show("normal")

s "Please, help me with maths."
The text in quotes is the name of the facial expression we want the character to
make. If the base image is sakura1.png and the name of the expression is
smiling, then the engine will display the image sakura1 smiling.png as the
facial expression.
You can hide a character sprite using hide. For example, you can hide Sakura
with sakura:hide(). This is useful when a character leaves but the scene stays
the same.
Choices
Many visual novels allow the player to make decisions that influence the outcome of the story. In this tutorial, we are going to let the player decide if they want to help Sakura study maths or not.
The first thing we need to do is define what will happen when the player chooses each option. In order to do that, we are going to do something very similar to what we did with characters and character sprites. For each option, we are going to define a block of code with the outcome of that decision, and we are going to give a name to that block so that we can use it later.
These blocks of code are called functions, and they are defined like this:
help = function()
    h "Okay, I will help you."
    sakura:show("happy")
    s "Really? Thanks!"
    h "No problem, it will help me review the subject."
end

dontHelp = function()
    sakura:show("nervious")
    h "Sorry, but that's my worst subject, I don't think I will be able to help."
    sakura:show("serious")
    s "Okay, no problem."
    s "I guess I will ask someone else."
end
Here we define two functions, one called help and the other called dontHelp.
A function starts with function() and ends with end, everything in the
middle is part of the function.
If you try to launch the game now you’ll see that nothing has changed. This is because we’ve defined the functions but we haven’t used them yet. Let’s fix that.
In order to present a choice to the player we need to define a question in the same way we’ve been defining things before.
q = Question.new({
    "Help her", help,
    "Don't help her", dontHelp
})
To create a question we need to give it a list with the options the player can choose. The text in quotes is the text of the option the player will see, and the text without quotes is the name of the function that contains the code of the outcome of that option.
Now that everything is defined, we can present the choice to the player with
q:ask(). Here is the script so far:
h = Character.new("Haru")
s = Character.new("Sakura")

sakura = CharacterSprite.new("sakura1.png")

scene("street day.png")

say "I'm on my way home from class."
say "There are more students than usual today."
say "I guess that makes sense, midterms are coming closer and all club activities have been suspended."

sakura:show("smiling")

s "Hi there, Haru! Are you going home now?"
h "Yes I am. I want to study for the midterms."

sakura:show("serious")

s "Well, about that... I wanted to ask you something."
h "What is it?"

sakura:show("normal")

s "Please, help me with maths."

help = function()
    h "Okay, I will help you."
    sakura:show("happy")
    s "Really? Thanks!"
    h "No problem, it will help me review the subject."
end

dontHelp = function()
    sakura:show("nervious")
    h "Sorry, but that's my worst subject, I don't think I will be able to help."
    sakura:show("serious")
    s "Okay, no problem."
    s "I guess I will ask someone else."
end

q = Question.new({
    "Help her", help,
    "Don't help her", dontHelp
})

q:ask()
Flags
Sometimes you will need to remember a choice the player has made so that it can affect the story after a common section of the script. Let’s see an example.
We are going to extend the story of our game by adding a common section after
q:ask():
hideText()
scene("black.png")

say "A week later..."

hideText()
scene("street day.png")

h "Great! I was able to pass all of the tests!"
There is a new function here, hideText. It does what the name suggests, it hides
the box where the text of the game appears with an animation. I added it just for
aesthetic purposes, it makes scene transitions look nicer.
Now, after this common section we want Sakura to thank Haru for helping her with maths only if the player chose to help her.
Up to this point, we’ve only used variables to give a name to the things we defined,
but variables can store any kind of value. This time, we are going to create a
variable called playerHelpedSakura and we are going to set its value to
false, meaning that the player did not help sakura. Add this line to the
beginning of the script:
playerHelpedSakura = false
After that, we are going to change its value to true, which means that the player
did help sakura, in the help function we wrote before:
help = function()
    h "Okay, I will help you."
    sakura:show("happy")
    s "Really? Thanks!"
    h "No problem, it will help me review the subject."

    playerHelpedSakura = true
end
We can check the value of playerHelpedSakura after the common section using an
if statement:
if playerHelpedSakura then
    sakura:show("happy")
    s "Me too!"
    sakura:show("smiling")
    s "Thank you for your help!"
    h "You're welcome!"
end
The block of script between then and end will only be run if the condition
is true. We can also add a block of code that will only be run if the condition is
false using else:
if playerHelpedSakura then
    sakura:show("happy")
    s "Me too!"
    sakura:show("smiling")
    s "Thank you for your help!"
    h "You're welcome!"
else
    h "I feel bad about refusing to help Sakura with maths."
    h "I hope she didn't fail the test because of that."
end
Ending the game
We’ve written a masterpiece with a deep, complex story, branching paths and stunning visuals, but right now, when the script ends the game just stops. Let’s fix that. Add this at the end of the script:
hideText()
scene("black.png")
sleep(1)
openScript("_start.lua")
Here, we hide the text and then fade to black. After that, we use a new function,
sleep, to pause the game for 1 second while the screen is in black. Next, we use
openScript to run the script _start.lua.
For now, as we’ve written the script of our game in _start.lua this will cause
the game to restart, but we are going to change that in a moment.
Releasing your game
Releasing your game is easy, you just need to distribute the files in your game folder to your players. You could zip them and give the zip to them or you could use a third party tool to create an installer. Remember that your players will need to have Visual C++ Redistributable 2015 in order to run the game.
It is possible to compile the scripts, which should improve performance slightly and add a layer of obfuscation. However, at this moment Iris Engine doesn’t provide the necessary tools to do that, so you will need to use a third party Lua compiler.
What’s next?
In this tutorial we’ve only scratched the surface. Here is a list of links you will find useful:
- Language reference
- A more in-depth view of the scripting language. Here you will learn how to write the scripts of your games.
- Working with visuals
- In this section you will learn how to create the visual part of your visual novel. Learn about sprites, transitions and animations.
- API reference index
- Here you will find detailed information about all the functions and classes at your disposal.
- Examples and templates
- Learn through examples. Here you can find full games made with Iris Engine you can use as a learning resource.
Full script
Here is the full script of the game.
_start.lua
start = Button.new("button.png", 1, "Start")
exit = Button.new("button.png", 1, "Exit")
start.onClick = function()
scene("black.png")
openScript("game.lua")
end
exit.onClick = function()
scene("black.png")
exitGame()
end
start:setPosition(489, 450)
exit:setPosition(489, 550)
scene("menu.png")

start:show()
exit:show()
game.lua
h = Character.new("Haru")
s = Character.new("Sakura")

playerHelpedSakura = false

sakura = CharacterSprite.new("sakura1.png")

scene("street day.png")

say "I'm on my way home from class."
say "There are more students than usual today."
say "I guess that makes sense, midterms are coming closer and all club activities have been suspended."

sakura:show("smiling")

s "Hi there, Haru! Are you going home now?"
h "Yes I am. I want to study for the midterms."

sakura:show("serious")

s "Well, about that... I wanted to ask you something."
h "What is it?"

sakura:show("normal")

s "Please, help me with maths."

help = function()
    h "Okay, I will help you."

    sakura:show("happy")

    s "Really? Thanks!"
    h "No problem, it will help me review the subject."

    playerHelpedSakura = true
end

dontHelp = function()
    sakura:show("nervious")

    h "Sorry, but that's my worst subject, I don't think I will be able to help."

    sakura:show("serious")

    s "Okay, no problem."
    s "I guess I will ask someone else."
end

q = Question.new({
    "Help her", help,
    "Don't help her", dontHelp
})

q:ask()

hideText()
scene("black.png")

say "A week later..."

hideText()
scene("street day.png")

h "Great! I was able to pass all of the tests!"

if playerHelpedSakura then
    sakura:show("happy")

    s "Me too!"

    sakura:show("smiling")

    s "Thank you for your help!"
    h "You're welcome!"
else
    h "I feel bad about refusing to help Sakura with maths."
    h "I hope she didn't fail the test because of that."
end

hideText()
scene("black.png")
sleep(1)
openScript("_start.lua")